Sunday, August 19, 2012

The End ... For Now

Hi you guys ....

So ....

I haven't posted in like two/three weeks.

Two weeks ago was Exam week and I had to prep for it the week before that and last week was Fiesta week ... busy sched :( 

Anywho ...

I have come to a decision.
It wasn't easy but I had to do it.


I'm freezing my blog.


I've seen what nail polish and my blog has done to my school performance.
I'm not linking it.


Maybe I can post some time ... but it's not going to be soon and it's not going to be regular.

We all have priorities.
I have to carry out mine.

Although when Summer 2013 comes (In the Philippines it starts on March), I will be posting regularly again .... and I think I can handle doing so too in college since school doesn't go on for 8 hours a day :D


But for now, goodbye, my dear readers and I absolutely have to thank all of you for giving me the motivation to blog about my nail arts more :)

And so here is my last nail art post ..... for a long time ..

I promised you guys that my next(this) post would be a tutorial .... so here it is


STUFF I USED:


Start off with a white base colour (to brighten up the top colours)

next, with your darkest purple, dab on a generous amount on the tip of your nails.

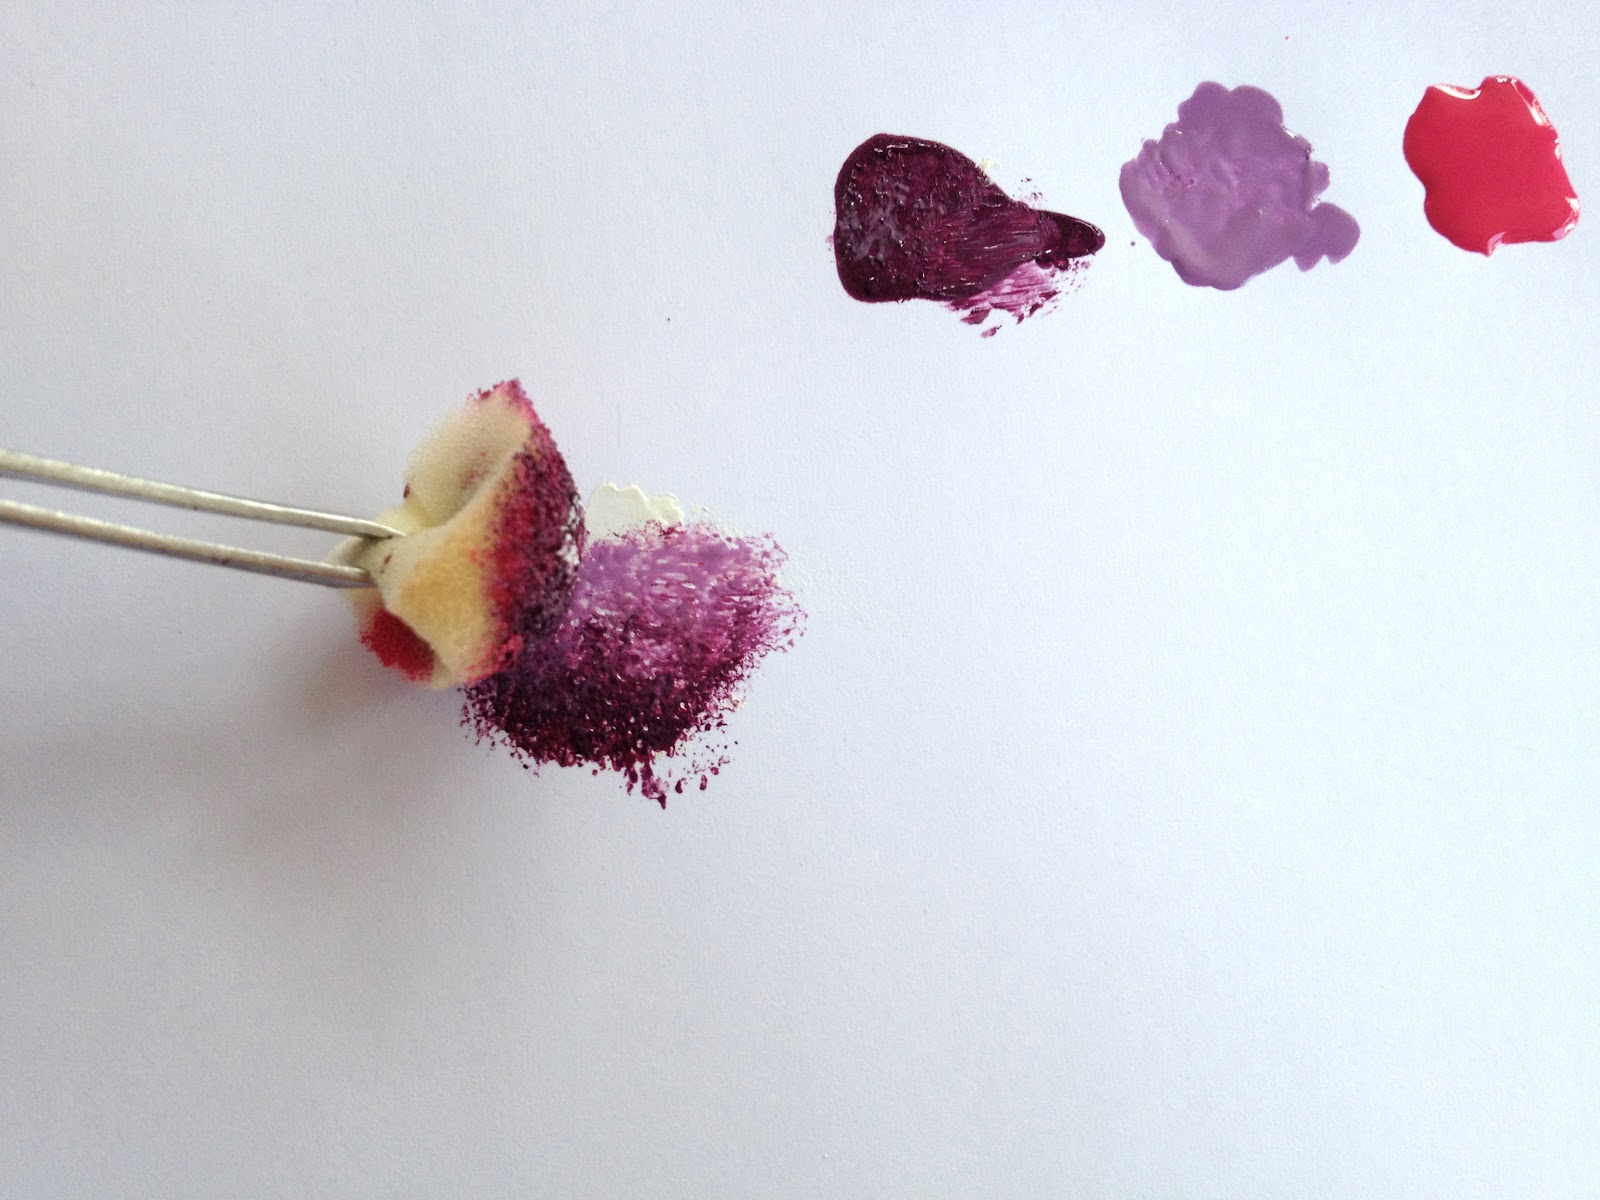
Next, with your middle colour (light purple), dab some on the middle part of your nail.

Then, with your pink, again dab some on the root part of your nails.

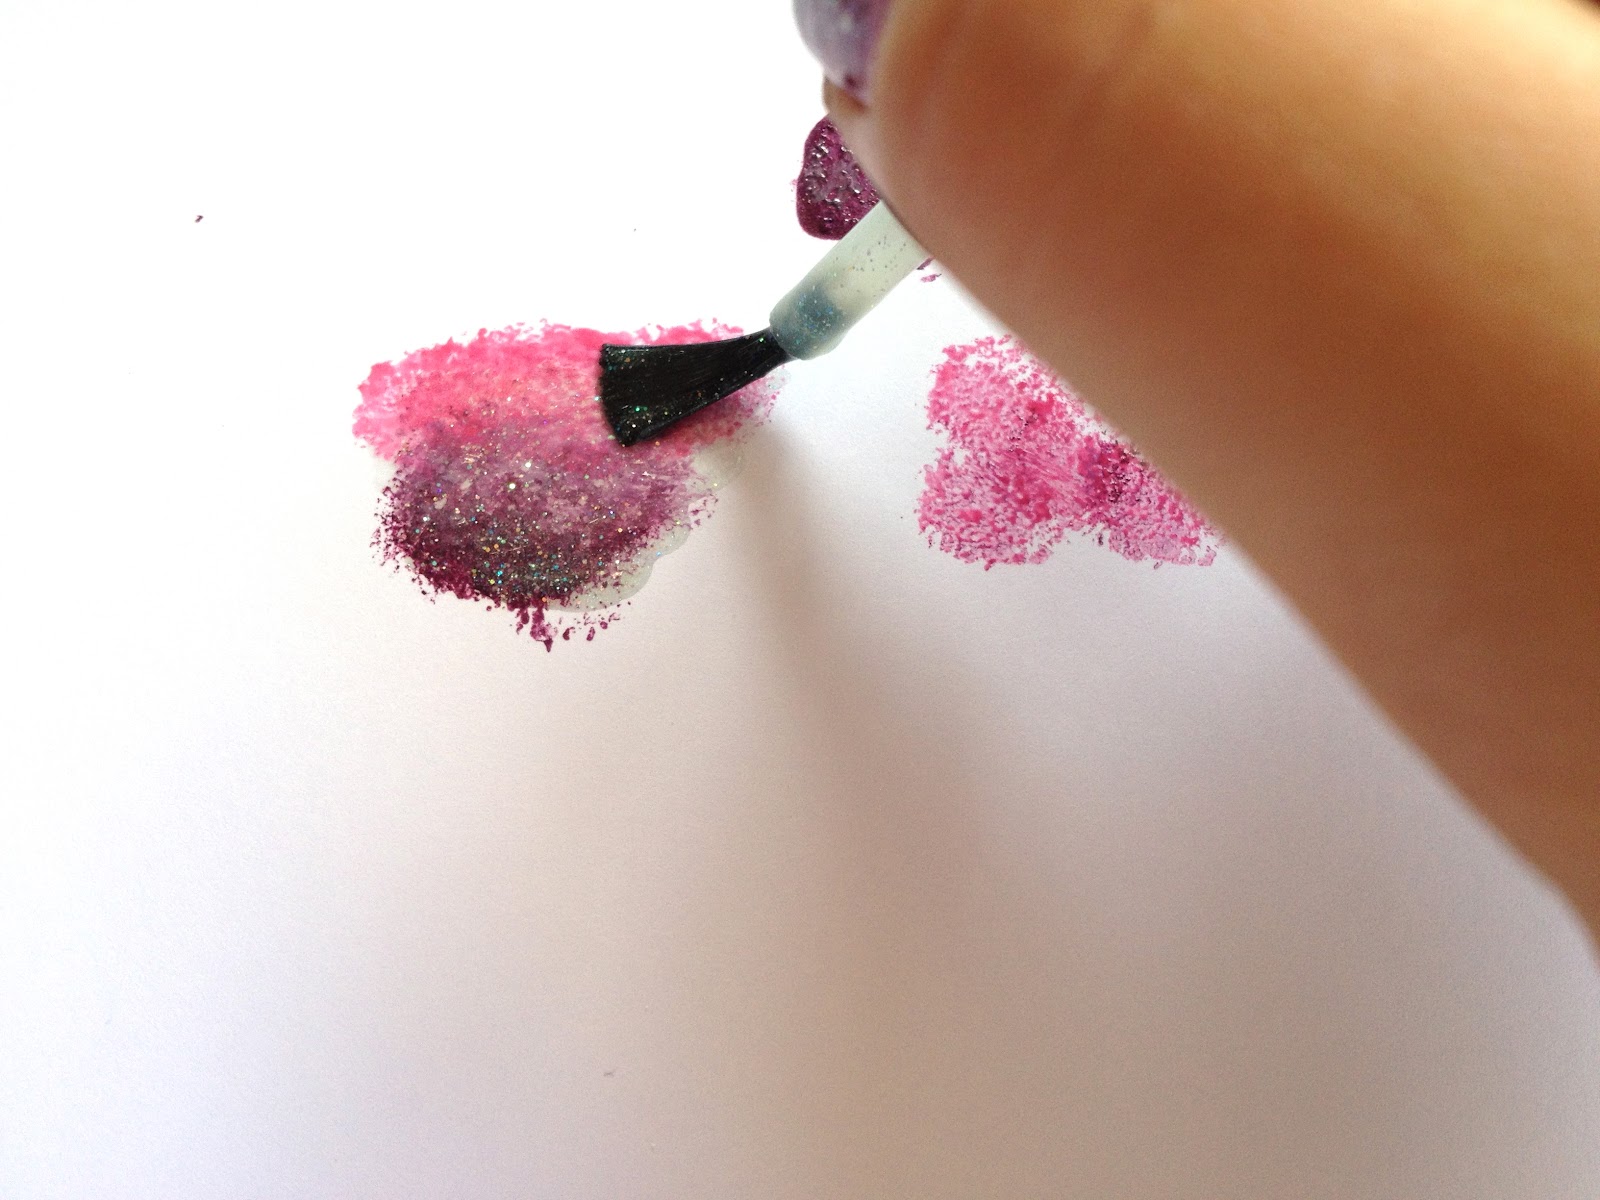
To smoothen out the texture, apply some topcoat immediately. 
You can use glitter top coat to add a bit more magic to it.

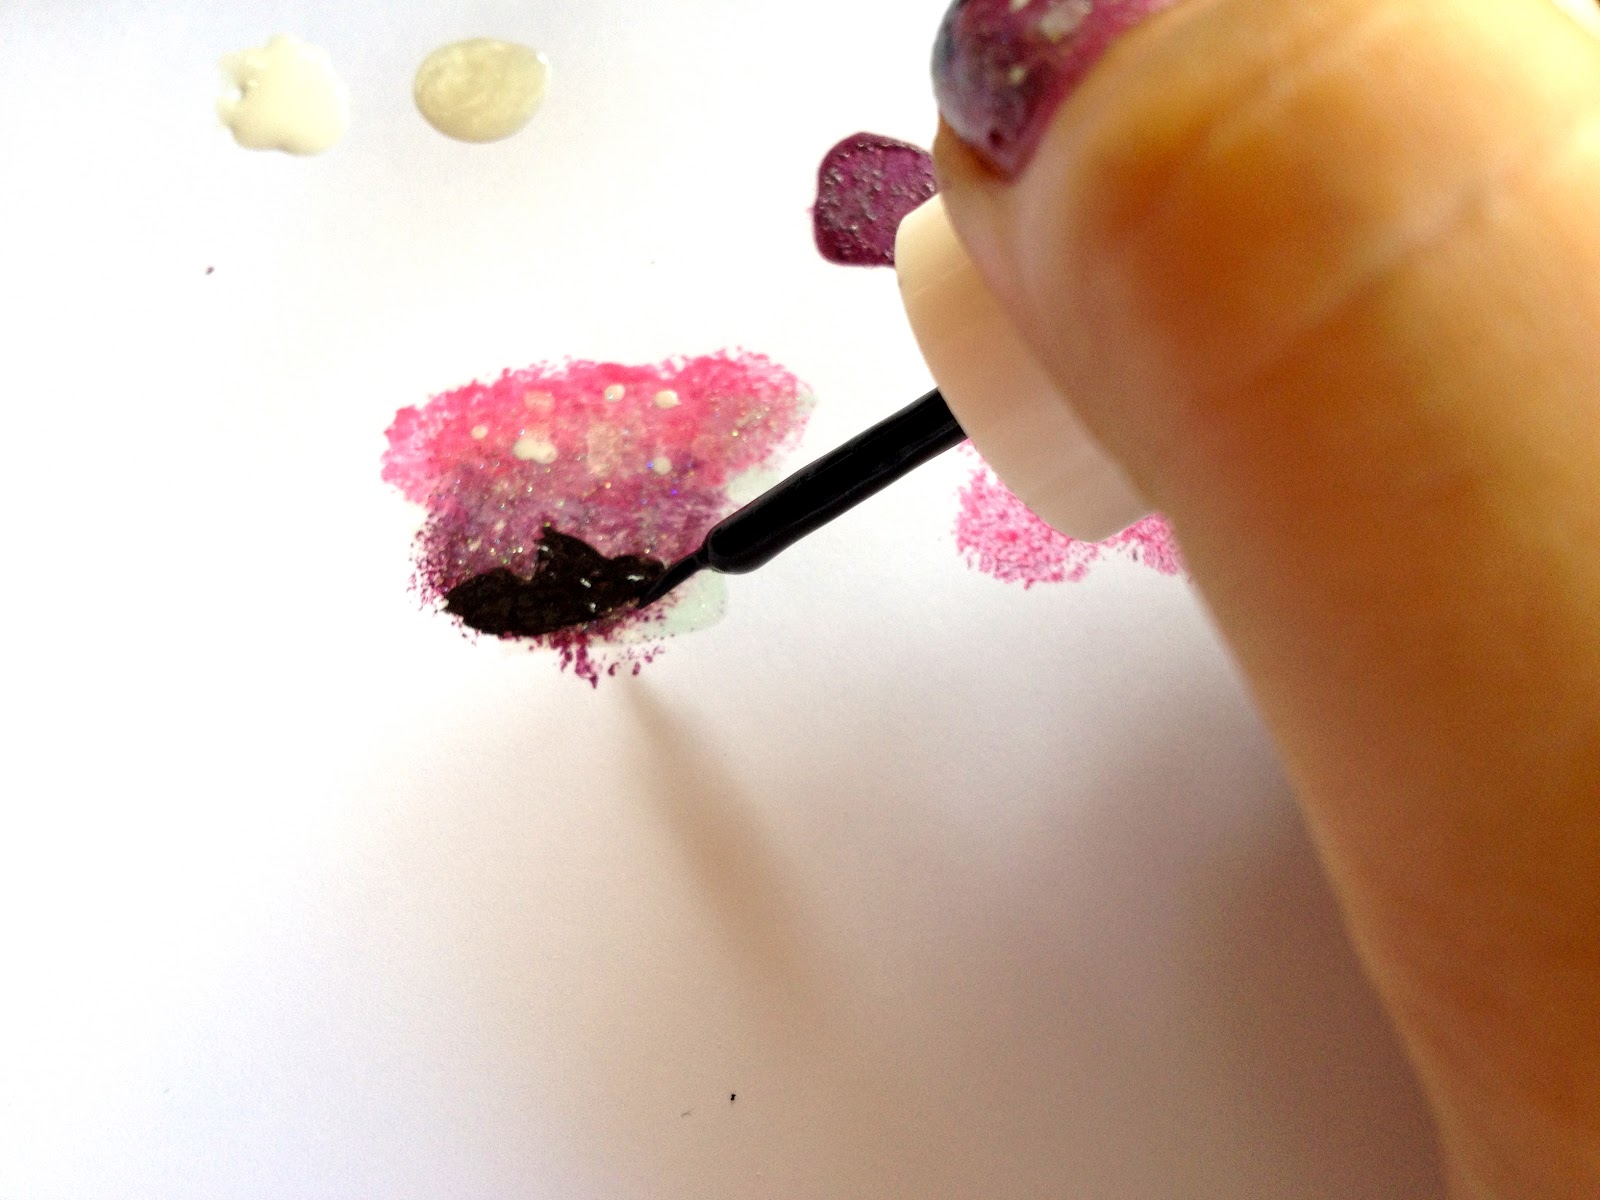
With your shimmery white (I used O.P.I. Kyoto Pearl) and using a dotting tool,
add small dots on the root part of your nail as stars.


Then, with a toothpick, dot on some tiny plain white dots still on the root part of your nails.

Apply some more glitter top coat.

With your striper or deco brush, draw on some mountains on the tip of your nails.

Finally, brush on some clear top coat to seal in your design.


-Messy on the edges ... I clean my cuticles awfully-


Well, that's it.
I'm really going to miss updating my blog :(


Again, I'd like to say thanks to all my readers, to you.

Goodbye 


Until next time ...

Saturday, July 28, 2012

A Week's Worth of Expression

HI HI HI <3

I've been gone long and my posts aren't that nice anymore, I know.
I promise, the next post I publish is going to be a tutorial (that, or another mini haul post).

And so, to make up for a week's worth of being MIA, here is a photo diary of the nail arts I did last week. 
Ok,  I'll get on with it then .... 

On Saturday last week (July 21, 2012), our school's basketball team had to play against JMC(Jose Maria College) which so ironically just happens to be the school I used to go to for 8 years (grade school - 2nd year HS). I just HAD to come. Not because of the game. I"m not much of a fan of basketball. I had to come because ... I just .... I just felt like I had to. 

Ateneo lost by one point (which of course, bummed me out). Buuut .... that's life. People win some and lose some. The part I was really glad about though, was getting together with my friends. It's too bad we don't have a picture together. 

Here's what I had on my nails during the game.


I've already tried doing this very simple version of Aztec nails back in March but I used pastel colours then. 


My nails are really short here :(


The topcoat (Cutex Top Coat) was kind of a disappointment. I had such high hopes for it.
After a day of air-drying, it still dents whenever I hit it. :( [Partially my fault xD]


Then, on Saturday afternoon, I did another nail art and here's what I came up with ... 

Polish all over my cuticles T_T I'm a horrible mani applier. 

I had no intention whatsoever to make this the way it is. I actually wanted to do black and white lace nail art but I just thought of a domino and dotted some black polish on my Pinky, an exclamation mark on my Index finger (which by the way, was not supposed to be an exclamation point. I planned to make it just a plain V like Rhianna has on her nails on her Where Have You Been MV.) And theeen ..... in comes the dog or croc or whatever it is I have on my middle finger. -.- It looks so weird.

Buuut ... I had a lot of fun doing this :D Something edgy ... for a bit of change.

 And theeeeen... I changed my nail art agaaaain ..... 


I love everything floral so much .. I just ... so here, yet again, is another Flower-inspired nail art. [ Which does not look very flowery and awesome :( ]


I have no idea what flower this is inspired by but ... it's a flower, and that's that xD 


Before I end this post, here is a picture of me and my lovely book WHICH WAS THE LAST STOCK THE BOOK STORE HAD WHEN I BOUGHT IT. *I feel so lucky*
When you know a book and its movie by heart and just want a really pretty copy of it ...

This is love T_T HAHAHA.

Jane Austen will forever be my heroine. 
NO, not the drug.


Thank you for stopping by and reading this 
I hope you have an awesome week ahead! :D


Saturday, July 21, 2012

Wild Like A Zebra

Oh . My . Gosh ... has it not felt like forever since I last posted something? 
I am so sorry for being MIA for about two weeks T_T.

BUT .... just because I've been gone for fourteen days, doesn't mean that I didn't get my hands on some pretty lacquers <3 HAHAHA

Let me start off (or continue) by saying that NO. I am not at all wild, like a zebra is. The wildest thing I've ever done/drunk (I don't think you could even call it drinking, I practically just took one sip and realized that it tasted horrible) was root beer. The non-caffienated one. 

WILD .... so wild. 


This nail art was actually done last week, July 14.
I missed stamping on my nails and so I picked a plate and did my thing.

Here's the output: 
[THIS MAKES ME MISS MY LONG NAILS A LOT]


I KNOW! T_T 
Dirty cuticles (I find it so hard to remove the excess stamping polish on my nails).

I'm writing a series of posts tonight just because I feel so inspired to. (Must be the new polishes I bought.)

HAHAHA
Thanks for reading this and for you guys' continued support <3

Love lots,


Friday, July 6, 2012

Flower Power: Crazy Daisy

Hi! :D
I'm sorry, I have this thing for corny stuff ......... esp. corny titles. -.-
Okay so I say Crazy Daisy because, this "Daisy" that I did last week, Friday, and will be introducing to you today, may look a bit crazy because it doesn't really look like a Daisy.

Corny rhymes ... *sigh*

You see, here is how a regular daisy looks like:

http://www.cvni.org/biodiversity/wildflowers/ox-eye-daisy/
[IMAGE SOURCE]

And here is how my version of a Daisy looks like:


Oh hey wait, was I really aiming on making them look like Daisies or that miniature flower on top of my Index finger? O.o

Eitherway, those are Yellowy-White flowers I have there on my nails and that's that.

HAHAHA THANKS FOR READING THIS REALLY SHORT POST.

Check back soon <3


Tuesday, July 3, 2012

Heart Skips A Beat

OH HI THERE, YOU! :D :'>

Today (more like last Friday), I did an ECG nail art (not really the machine, but the heart beats that show up in it) It's nothing fancy or hard ... just one of those times when you want a heart on your finger .... do you get me? .... O.o

Anywho .. here's how it turned out .... I used black acrylic paint because it's easier to work with 


I know! Ugh, the heart beats don't look perfect ... sorry, first time -.- they don't even look like the zig zags that show up in an ECG T_T


Didn't add any top coat because as I said last week (Friday, to be exact) I did three nail arts and this was the second :3

THANKS FOR READING THIS REALLY SHORT POST XD HAHA

Check back on Friday at 2pm for another new post :D


Friday, June 29, 2012

City In Sunset

HOLA :D
How was your week?

Yesterday, as me and my dad drove home from school, I noticed that the sky turned red-orange as the sun set and thought how beautiful it looked. It gave me an idea ....... a new NAIL ART IDEA :D HOORAH!

I'm not going to do a tutorial on this ... just because ... I felt lazy and I didn't want to stop and take pictures and stuff .... but this is very easy and it can be done without tutorials....


I felt like there was something missing and so I added tiny (eneven -.-) yellow dots on the buildings for windows.


I didn't put any topcoat on this because I replaced it after I took these photos.
I did three nail arts today so that I could create posts now and publish them throughout the next week :)


Check back on Tuesday at 3pm (If you don't have school that day or are brave enough to browse the web during your I.T. class if it's on the same time)

HAHA ... but no, don't browse the web when you're in school. •_•


THANKS FOR READING <3 TELL ME WHAT YOU THINK BY COMMENTING
Shoutout to (By order of request): 

CLICKIE! :D AWESOME PEOPLE YAN <3


Saturday, June 23, 2012

18th Century Soul

HI EVERYBODY. IT HAS BEEN SOOOOO LONG since I last posted something.

I am genuinely sorry.
I've been so caught up with school and adjusting my schedule.
I barely even get to watch tv :(

Anywhoooo .... 
It's the weekend! (OHHH YEYAHHH)
But it's Sunday ... and that makes me sad :( Because it means tomorrow's going to be a school day ... and it will be a school day until Friday and until then, I'm not going to be able to play with my nail babies and read, and watch my favorite movies and blog and stuff :(

Buuut since it's the last day of the two-day break I so scarcely get to make the most of for this week, let's get this post on the go. 

Wait, OMG! That reminds me! :D Next week, we're not going to have a class on Friday .... I don't know if I should be bummed out about that or not because I'm really starting to like school again ... but it means that there's a bigger chance of me being able to post more than once! YAY :D


Yesterday, I went on a Period films movie marathon .. and it was AWESOME.

One thing you guys should know about me is that I am absolutely engrossed in everything that's from the 18th Century. It's like, whenever I see movies or posters or costumes or read stuff about back then, I feel this deep connection to it (so cliche') but so true! 

Sometimes, I even feel like I'm an 18th Century Soul stuck in this body at present.

But still, I am happy that I'm born in this era though xD

This isn't really going to be long because it's was one of those times where I didn't want to do a tutorial and just carry on with what I'm doing ...... I guess we all experience those times.


Ya'll know what to do first....

RETRIFETCH :D 
If you still don't know what that means, scroll down and read my other blog posts :D
I don't need to trim and file .... My nails are so short now T___T

STEP 1. Paint your nails a faint/sheer nude colour. I used my Revlon Barely Peach (polish mini haul post). I brushed on about 4 layers (I know, it's a lot xD)

STEP 2. It's best to brush on a top coat first before stamping ... so that if ever you want to redo a nail, you don't have to paint your base colours on again.

STEP 3. Grab your plate and everything you need that comes along with it and STAMP :D (I forgot what plate I used ... *it's kinda starting to be a habit now* -.- but use the plate with the tiny flowers on it. You'll see what I mean later) or you could find another design that makes you think of the 18th Century :D


It may not look extraordinary and astonishing but it's how pertinent and significant it is to me that makes it matter a lot.

It's how it makes me feel so calm and serene and how it makes me appreciate everything else around me two times more that makes me view it as something more than it really is.

I feel like Elizabeth Bennet or Jane Austen herself now that I have it on my nails xD (LOOOL)


I ruined my right Index Finger though :( Not posting a picture because it looks awful -.-
Didn't want to redo it because I'm planning on wearing this to school because it's not that obvious (nail polish isn't allowed in Ateneo T_T .. I hope they allow it in college though ... ) and if ever I do get caught, then it's going to feel awful redoing this today but having to remove it tomorrow :(


Here are two pictures of some nooby Rose clay work I did.
I apologize for its extreme plainness.

With more practice, I'm sure I'll improve at least a bit, as with my nail art skills. xD


Such noobery. HAHA


Ok, that is all for today :D

Check back next FRIDAY <3

Thanks for reading this.
To the people who kept on viewing my blog even though it's been almost two weeks since I last posted anything .... I am sincerely thankful *cries*


Have a greet week <3


SHOUTOUT TO RUGETTE JARAPLASAN AND TONI ESTROLOGO WHO BY THE WAY ALSO HAS HER OWN BLOG! :D Check it out at my sidebar or click this: http://itsafashionflipside.blogspot.com/ 

Tuesday, June 12, 2012

HI ELLYBODY :D

Today's nail art was done last week, actually.
I'm not even wearing it on my nails right now.

It's so sad because I've cut my nails T_T It's super short right now.
I had to do it for school. You can't even wear nail polish in my school T________T.

Buuuuuut anyway, it's the last day of my 2012 summer (Although last Sunday should have been the last .... I was absent last Monday... I didn't feel very well)

I know that it's the Philippines' Independence Day today and I should've made a nail art related to it buuuuut no. I just don't feel like it.

You feel like you like things and you do it.
You don't feel like you like things and you don't.
That's that xD

Moving on :D

I named this post "Pink With A Hint Of Sparkle <3" even though it's completely the other way around.
You'll see what I mean xD

Now this is going to be a very short tutorial.
I don't think the pictures are even going to make you think that it's a tutorial xD

Anywhoooo ...

I forgot to take a picture of the colours and stuff I used and for that, I deeply apologize.

You know these colours from my tiny polish haul but just in case you don't ... the one above is City-Pretty Rose and the one below is Follow Me On Glitter, both from Nicole by OPI.


I used my The Face Shop basecoat, The Face Shop Silver, and Sally Hansen Insta-Dry Top Coat. I also used a Konad plate (I can't remember what plate number xD) Oh and a tiny dotting tool :D

So okay, first, RETRIFETCH.

Remember? Don't remember? 
Well, either way ... 

REmove excess nail polish
TRIm nails.
File nails.
ETCHetera. (Harderners and oils)

*STEP 1. Colour all your nails with Follow Me On Glitter EXCEPT FOR YOUR RING FINGER.


*STEP 2. Colour your ring finger with City-Pretty Rose.


*STEP 3. Stamp on a ribbon on your ring finger.

*STEP 4. With a dotting tool, place a tiny dot of silver nail polish in the middle of the ribbon. If you have a rhinestone, then use it instead by placing it in the middle of the ribbon after applying some top coat on it.

*STEP 5. Generously brush on some top coat.

AND YOU'RE DONE!


Here's the final output.

( I JUST LOOOOOOOVE FOLLOW ME ON GLITTER!)
It reminds me of roads though ... hahaha :D


And that is all for today :D 

Check back sooon! 

Comment below! Tell me what you think and tell me too if you have suggestions or requests :3